
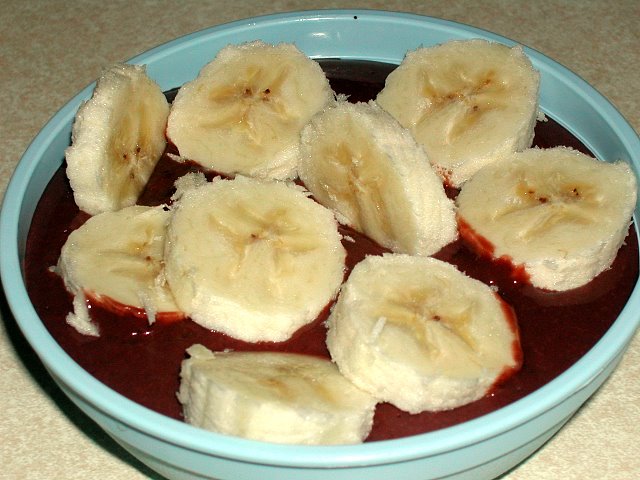
 I made some instant Jell-O fudge pudding and sliced up some bananas to form "coins". It is the perfect dessert for kids, potassium and calcium with less sugar than most other desserts. I propped some sticking up, but for even more fun, you could make it in a big communal bowl, burying the banana slices inside, and let your kids dig them out like real pirate treasure.
Showing posts with label treats. Show all posts
Showing posts with label treats. Show all posts
Monday, July 17, 2006
Yarr! Pirate Treasure!
I made some instant Jell-O fudge pudding and sliced up some bananas to form "coins". It is the perfect dessert for kids, potassium and calcium with less sugar than most other desserts. I propped some sticking up, but for even more fun, you could make it in a big communal bowl, burying the banana slices inside, and let your kids dig them out like real pirate treasure.

Friday, July 14, 2006
Long Yoke (Bak Kua)
THANKS TAZZ for re-creating and posting this delicious treat for all to enjoy.
Here is the pork mixture as described to be sticky/gluey. It kind of was. Since I could not find any pork mince that was fatty (I could not obtain any at Walmart and they only had the healthy lean pork in Publix) I added 1 tbsp of vegetable oil.
Here is the pork mixture as described to be sticky/gluey. It kind of was. Since I could not find any pork mince that was fatty (I could not obtain any at Walmart and they only had the healthy lean pork in Publix) I added 1 tbsp of vegetable oil.
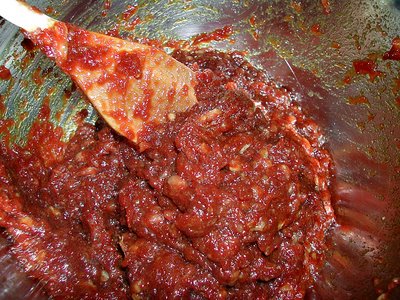
The anticipation builds as I wait for the outcome ... it smelled Heavenly!

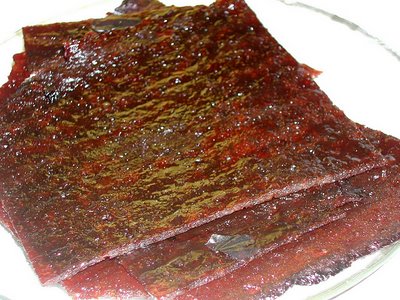
After a few more minutes ... TADA! Perfect! The edges were slightly crispy and the center parts gooey and chewy ... woah delightful. I baked it over my cookie cooling rack too, since it had the square marks that is usually found on KL made bak kua. Plus it helped me press out the meat until it achieved the thinness that I wanted.
Thursday, July 06, 2006
Tea Egg (Cha Yue Tan)
I had packets of herbal (tea) egg pouches sent to me from Malaysia by my mom, and I finally gave them a try.
Of COURSE being me, I would actually kick them up a notch using my nose and tummy rumblings.
I added more dong kuai, pak kor, kei chi and some others. I forget now, but I also added dark soy sauce and some sugar. After boiling overnight, it achieved this result:
Of COURSE being me, I would actually kick them up a notch using my nose and tummy rumblings.
I added more dong kuai, pak kor, kei chi and some others. I forget now, but I also added dark soy sauce and some sugar. After boiling overnight, it achieved this result:
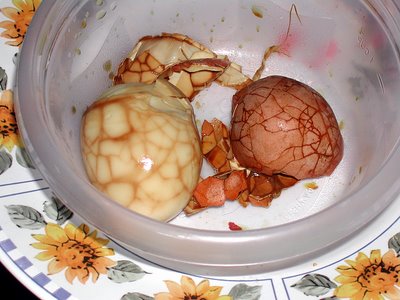
After two days it looked even darker and more beautiful like this:
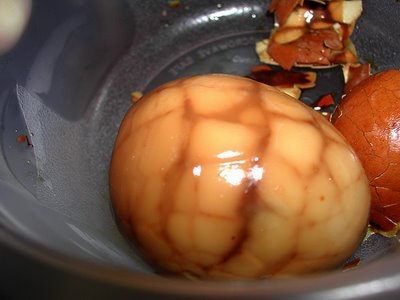
It was so delicious! I think I ate over 6 eggs within two days (of course I tossed the yolk and ate just the whites) In order to start a new batch the next time and have it as good as the first, I conserved the liquid in a container in the fridge.
Thanks MUM! For both the packets of herbs and the slow cooker!
Saturday, May 20, 2006
Perfect Blueberry Cupcakes
 Sure, I call these the perfect blueberry cupcake. Why? My mother saw me making them and eating them, I almost purred with delight as they came out fluffy and light on top and moistly tantalizing on the bottom (the best part!) You can substitute blueberry for mashed bananas and chopped up pecans, or get chocolate cake mix and add swirls of caramel or unsweeteneed chocolate chips for the ultimate chocolate molten cupcake! The possibilities are endless, strawberries, chopped cherries ... jalapeno cupcakes?
For this, you will need:
A cupcake/muffin tray and liners
Large mixing bowl
Medium whisk
Ingredients:
1 box of Yellow Cake Mix (and all the ingredients it calls for on the box)
1 1/2 cup fresh or frozen blueberries
 1. Prepare the cake mix according to the box instructions. Here I combined all the wet ingredients first, eggs the water (or substitute FULL FAT milk, don't skimp here, it makes the cake smell divine) and the butter (or use vegetable oil as a substitute for a healthier, lighter version tastes just the same!)
2. Add your cake mix to the wet ingredients and beat by hand, until all the larger lumps have dissolved. Smaller lumps are fine.
3. Thaw your frozen blueberries in the microwave (or beforehand), drain them and fold into the cake mix. Do not overmix as you want the yellow parts of the cake batter to show, and just have streaks of blue from the blueberries.
 4. Scoop out into the prepared lined muffin tray segments up to 2/3rds full.
5. Bake at 350F until lightly browned on the top, they should look solid, pierce with a toothpick or skewer, if it comes out clean, they are ready to go. You want to watch out that they do not overbake! Remove from tray and let cool on a rack. Enjoy!
Wednesday, April 19, 2006
Kushi Dango
KUSHI DANGO (Recipe courtesy of About.com)

1 cup rice flour
3/4 cup warm water
For Sauce:
1 cup water
1/2 cup sugar
2 tbsps soy sauce
1 1/2 tbsp potatostarch/cornstarch
1 1/2tbsp water
*Bamboo skewers
PREPARATION:
Put rice flour in a bowl and add warm water. Knead the dough well. Make small round dumplings. Place the dumplings in a steamer and steam them on high heat for 10 min. Cool the dumplings and skewer them in bamboo sticks. (3-4 dumplings each stick.)
Mix water, sugar, and soysauce in a pan and put it on medium heat. Mix the water and potatostarch in a cup and set aside. When the sauce boils, add the starch mixture and mix quickly. Slightly grill the skewered dumplings and brush the sauce over them.
Marbled Pound Cake
Had a craving for it last night before we went to bed, but I was all snuggled up and warm under the blankets, so I waited until morning instead.

MARBLED POUND CAKE
Ingredients:
1-1/2 cups all-purpose flour
1 teaspoon baking powder
1/4 teaspoon salt
1/2 cup (1 stick/4 oz/113g) unsalted butter
1 cup granulated sugar
1 teaspoon vanilla extract
2 large eggs
1/2 cup milk
1 cup miniature semisweet chocolate chips (I substituted it with cocoa powder mixed in 2 cups of batter)
Instructions:
1. Preheat oven to 325 degrees F (160 C). Grease and flour a 9 x 5 x 3-inch or a 8 x 4 x 2-inch loaf pan; set aside.
2. In a medium bowl, stir together the flour, baking powder and salt; set aside.
3. In a large mixing bowl, beat butter with electric mixer on medium to high speed for 30 seconds. Add sugar and vanilla; beat until fluffy. Add eggs, one at a time, beating well after each addition.
4. Add flour mixture and milk alternately to butter mixture, beating on low speed after each addition until just combined. Spread 3/4 of the batter in prepared pan. Mix cocoa powder into the remaining batter (about 2 cups of batter) and drop it in batches over the vanilla batter. Using a spatula, swirl until a pattern is achieved as in the picture. (I thought I swirled mine enough but apparently not as the chocolate lingered only at the top and did not swirl to the center of the cake, oh well).
5. Bake the cake in preheated 325 degree F (160 C) oven for 55 to 60 minutes for the 9 x 5 x 3-inch loaf or 65 to 75 minutes for the 8 x 4 x 2-inch loaf or 45 minutes for the flat pan I used or until a toothpick (in my case, a satay skewer) inserted near the center comes out clean. Cool in pan for 15 minutes. Loosen the edges of the cake. Remove from pan and cool completely on wire rack.
6. EAT!

Pandan Kaya
PANDAN KAYA
(Tto make normal brown kaya, replace sugar with palm sugar and omit the pandan leave paste, but include 2 strips of pandan leaf into the mixture while it is cooking. Remove these later.)
500g SUGAR
10 PANDAN LEAVES
1 CAN COCONUT MILK (400ml)
4 EGGS
CHEESECLOTH
Actually, I did not really follow a set recipe, I modified someone else's, these are just the basic ingredients. I forgot to take pictures of the pandan leaves cut up into inch pieces and put into a processor. Blend it well with the coconut milk until it becomes almost paste.
In another bowl (preferable stainless steel) break the eggs and mix it well with the sugar. Then strain the pandan paste mixture over the eggs with the cheesecloth or a strainer. Mix that up well until the sugar is dissolved. It should look like this:

Meanwhile, fill a pot with water to act as a double boiler for the steel bowl. When it boils, turn down the heat to low and place the metal bowl over the pot. Stir occassionally for about 30 minutes or until it thickens. One of the recipes called for straining again before putting to the boiler, I did not but you see I had a back up plan. It turned out lumpy like this because I did not double strain.


After the mixture cooks, it turns into custard-like consistency and looks like that. To make it smooth like store-restaurant type kaya, I put it in my blender and pressed "Whip" or aka. highest speed available. The texture became like this:

Then you put it on bread (toasted or untoasted) and butter and YUM!

PANDAN KAYA! Happy tummy~
Subscribe to:
Posts (Atom)